Introduction
In this small project, I finally did what I was dreaming on doing since I started playing with the Kinect API. For those who don’t know what a Kinect is, it is a special “joystick” that Microsoft invented. Instead of holding the joystick, you move in front of it and it captures your “position”. In this project I interfaced this awesome sensor with an awesome software: blender.Kinect
The Kinect sensor is an awesome device! It has something that is called a “depth camera”. It is basically a camera that produces an image where each pixel value is related to how far is the the actual image that the pixel represent. This is cool because, on this image, its very easy to segment a person or an object. Using the “depth” of the segmented person on the image, it is possible, although not quite easy, to identify the person’s limbs as well as their joints. The algorithm that does that is implemented on the device and consists of a very elaborated statistical manipulation of the segmented data.Microsoft did a great job in implementing those algorithms and making them available in the Kinect API. Hence, when you install the SDK, you get commands that returns all the x,y,z coordinates of something around 25 joints of the body of the person in front of the sensor. Actually, it can return the joints of several people at the same time! Each joint relates to a link representing some limb of the person. We have, for instance, the left and right elbows, the knees, the torso, etc. The whole of the joints we call a skeleton. Hence, in short, the API returns to you, at each frame that the camera grabs, the body position of the person/people in front of the sensor! And Microsoft made It very easy to use!
With the API at hand, the possibilities are limitless! So, you just need a good environment to “draw” the skeleton of the person and you can do whatever you want with it. I can’t think of a better environment than my favorite 3D software: blender!
Blender side
Blender is THE 3D software for hobbyist like me. The main feature, in my opinion, is the python interface. Basically you can completely command blender using a python script inside the blender itself. You can create custom panel’s, custom commands and even controls (like buttons, sliders and etc). Within the panel, we can have a “timer” where you can put code that will be called in a loop without block the normal blender operations.
So, for this project, we basically have a “crash test dummy doll” made of armature bones. The special thing here is that this dummy joints and limbs are controlled by the kinect sensor! In short, we implemented a timer loop that reads the Kinect positions for each joint and set the corresponding bone coordinates in the dummy doll. The interface looks like this. There is also a “rigged” version where the bones are rigged to a simple “solid body”.
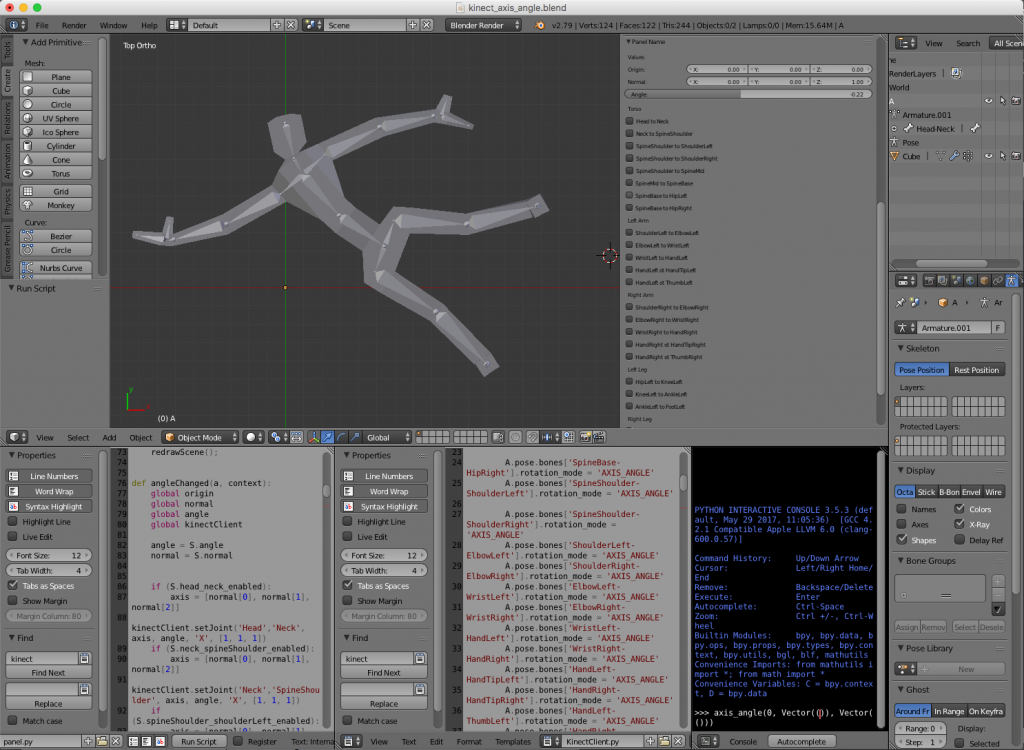 Hence, the blender file is composed basically of tree parts: the 3D body, the panel script and a Kinect interface script. The challenge was to interface the Kinect with python. For that I used two awesome libraries: pygame and pykinect2. I’ll talk about them in the next section. Unfortunately, the libraries did not like the python environment of blender and they were unable to run inside the blender itself. The solution was to implement a client server structure. The idea was to implement a small Inter Process Communication (IPC) system with local sockets. The blender script would be the client (sockets are ok in blender 😇) and a terminal application would run the server.
Python side
For the python side of things we have basically the client and the server I just mentioned. They communicate via socket to implement a simple IPC system. The client is implemented in the blender file and consists of a simple socket client that opens a connection to a server and reads values. The protocol is extremely simple. The values are sent in order. First, all the x’s coordinates of the joints, then y’s and then z’s. So, the client is basically a loop that reads joint coordinates and “plots” them accordingly in the 3D dummy doll.
The server is also astonishingly simple. It has two classes: the KinectBodyServer class and the BodyGameRuntime class. In the first one we have a server of body position that implements the socket server and literally “serves body positions” to the client. It does so by instantiating a Kinect2 object and, using the PyKinect2 API, asks for joint positions to the device. The second class is the pygame object that takes care of showing the screen with the camera image (the RGB camera) and handling window events like Ctrl+C, close, etc. It also instantiates the body server class to keep pooling for joint positions and to send them to the client.
Everything works synchronously. When the client connects to the server, it expects to keep receiving joint positions until the server closes and disconnects. The effect is amazing (see video bellow). Now, you can move in front the sensor and see the blender dummy doll imitate your moves 😀!
Motion Capture
Not long ago, big companies spent a lot of money and resources to “motion capture” a person’s body position. It involved dressing the actor with a suit full of small color markers and filming it from several angles. A technician would then manually correct the captured position of each marker.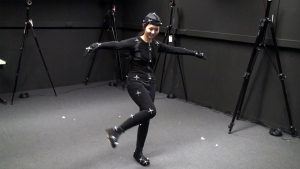 (source: https://www.sp.edu.sg/mad/about-sd/facilities/motion-capture-studio)
Now, if you don’t need extreme precision on the positions, an inexpensive piece of hardware like Kinect and a completely free software like blender (and the python libraries) can do the job!
Having fun
The whose system in action can be viewed in the video bellow. The capture was made in real time. The image of the camera and the position of the skeleton have a little delay that is negligible. That means that one can use, even with the IPC communication delay and all, as a game joystick.Conclusions
As always, I hope you liked this post. Feel free to share and comment. The files are available at GitHub as always (see reference). Thank you for reading!!!References
[1] – blender-kinect[2] – PyKinect2
[3] – PyGame